Tenant Admin
Creating your first credential config
Pick a format, define claims, attach a signing key, and start issuing.
A credential configuration is the template for everything you’ll issue: which format the credential takes on the wire, what claims it carries, which key signs it, and how it’s rendered as a PDF. This page walks through creating one end to end.
Prerequisites
Before you start you need:
- An active tenant (see Onboarding).
- Signing turned on (see Configuring a signer) — the recommended Cyfher-managed option sets this up for you, or connect your own backend — with at least one signing key under Keys.
The portal dashboard will surface both of these as next steps until they’re done.
Step 1 — Pick a preset (or start from scratch)
Navigate to Credential Templates in the portal sidebar and click New Credential Template. You’ll land on a preset picker.
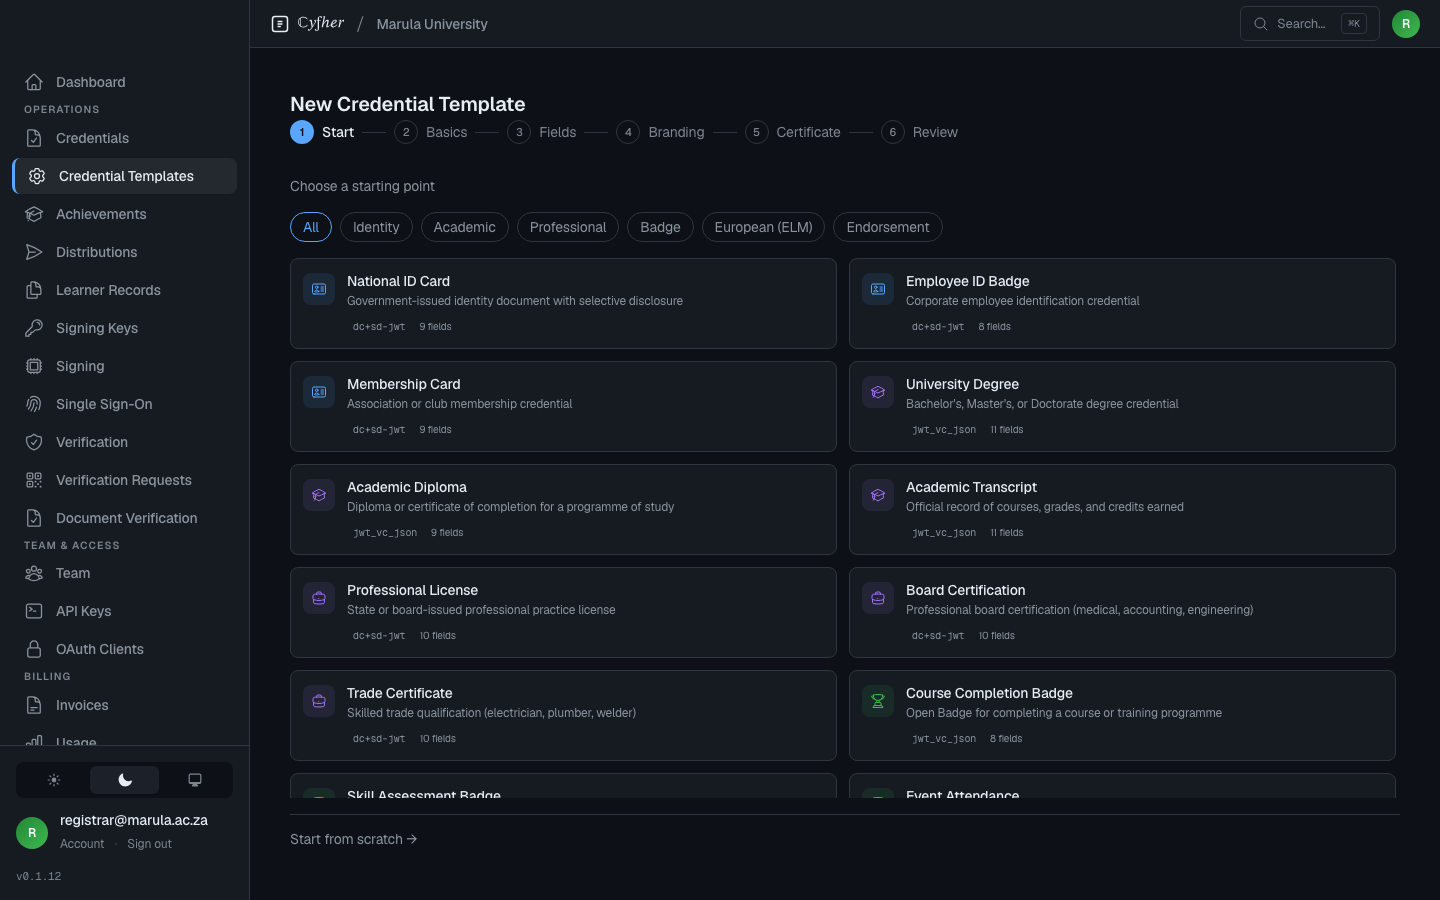
Presets are starting points filtered by category: Identity, Academic, Professional, Badge, European (ELM), and Endorsement. Each one pre-fills the format, the credential type and config ID, the display name and description, the claims schema, and the example claims template. Presets do not carry a certificate template — that stays blank until you write one in Step 5. You can edit anything afterwards. If none fit, choose Start from scratch.
Step 2 — Choose a format
Cyfher supports three credential formats. Pick based on what the verifier on the other end expects:
- SD-JWT VC (RFC 9901) — selective disclosure JWT. Sensible default for most use cases; let holders share only specific claims.
- W3C VC (VC-JWT) — W3C Verifiable Credentials Data Model 2.0 in JWT form. For verifiers that explicitly require W3C.
- mdoc (ISO 18013-5) — mobile document format. Required for mobile driver’s licences and government ID interop.
Open Badge 3.0 is not a fourth format. An Open Badge is a credential type carried inside the W3C VC format: the badge presets set the format to W3C VC and the credential type to OpenBadgeCredential. Pick W3C VC and start from a badge preset (see Step 1) for educational badges, micro-credentials, and CLR (Comprehensive Learner Records). Open Badge achievements cannot be issued as mdoc.
You can change format later by creating a new config, but you cannot retroactively change the format of credentials already issued.
Step 3 — Attach a signing key
Pick a signing key from the dropdown. Each key references the signer config that backs it, and the dropdown labels each one with its algorithm.
For mdoc, the dropdown is filtered: ISO 18013-5 requires an ECDSA key, so only your ES256 and ES384 keys are offered. If you have no ECDSA key, add one under Keys before creating an mdoc config. For SD-JWT VC and W3C VC the dropdown is not filtered — every active signing key is offered.
Step 4 — Define the claims
Build your claims in the field list: each claim has a name, a type (string, number, boolean, array, or object), and a Required toggle. That field list is the claims schema — it is Cyfher’s own small contract, not JSON Schema.
Validation runs over the claims the schema names, and only those:
- A claim marked Required must be present at issuance, or the request is rejected.
- A claim with a declared type must match that type.
- Claims not in the schema are not rejected. They pass validation and are issued as-is. The schema is a floor — “these claims must be here and must look like this” — not an allowlist.
Example data vs. real defaults
Two things look similar in the editor and behave very differently:
- Claims template — example data only. It fills the wizard preview and the sample CSV row so you can see the shape of a finished credential. It is never read at issuance and none of its values ever land in a credential.
- Claims defaults (
claims_defaults) — real values. These are merged into every issuance. The visual field builder cannot author them; switch to the JSON editor and add aclaims_defaultsobject:
{
  "claims_defaults": {
    "issuing_authority": "Example University",
    "programme_level": "Undergraduate"
  }
}
At issuance Cyfher merges in this order, with later winning:
claims defaults → external claims source → request claims
So a default is a fallback the caller can override, and the claims template changes nothing. One rule follows from this and is enforced at save: a required claim cannot carry a default. A default would always satisfy the requirement, making it unenforceable, so the configuration is refused.
Both the field list and the template are pre-filled when you start from a preset.
For mdoc configs the claims section adds a Namespace field above the same field list — it does not replace it. ISO 18013-5 groups data elements under a namespace, and every claim in the list is issued into the one you enter here. It’s pre-filled with the standard org.iso.18013.5.1 namespace, which suits most documents. The Mobile Driving Licence preset (under the Identity category) starts you off with this pre-filled.
For external claim sources (webhooks that resolve claim data from your system of record at issuance time), see the Claims source tab on the config form.
Step 5 — Branding and PDF certificate (optional)
- Display name, description, logo, colors — show up in the wallet when the credential is offered and stored.
- Certificate template — Typst source that renders a PDF certificate. Cyfher renders entirely in-process (no browser, no Chromium). Template data is exposed via
sys.inputs.data.*. Leave blank if you don’t need a PDF.
Reserved sys.inputs.data.* keys
If the config is linked to an achievement, Cyfher populates sys.inputs.data with a fixed set of platform-reserved keys before your own certificate_data is merged on top. Each key is only present when the underlying value is non-blank, so always read them with safe access and a default, e.g. sys.inputs.data.at("achievement_name", default: "").
| Key | Meaning |
|---|---|
achievement_name |
The linked achievement’s name |
achievement_type |
Humanized achievement type label (e.g. “Diploma”, “Certificate”) |
criteria_narrative |
Free-text narrative from the achievement’s criteria |
field_of_study |
The achievement’s field of study |
specialization |
The achievement’s specialization within that field |
credits |
Credits available for the achievement, as a number |
achievement_image |
URL of the achievement’s image, if one is uploaded |
recipient_name |
The recipient’s name, from the recipient_name (or name) claim on the issuance request |
The built-in default template (used when a linked achievement has no custom template) already renders these keys — see it for a worked example of safe access.
Step 6 — Save
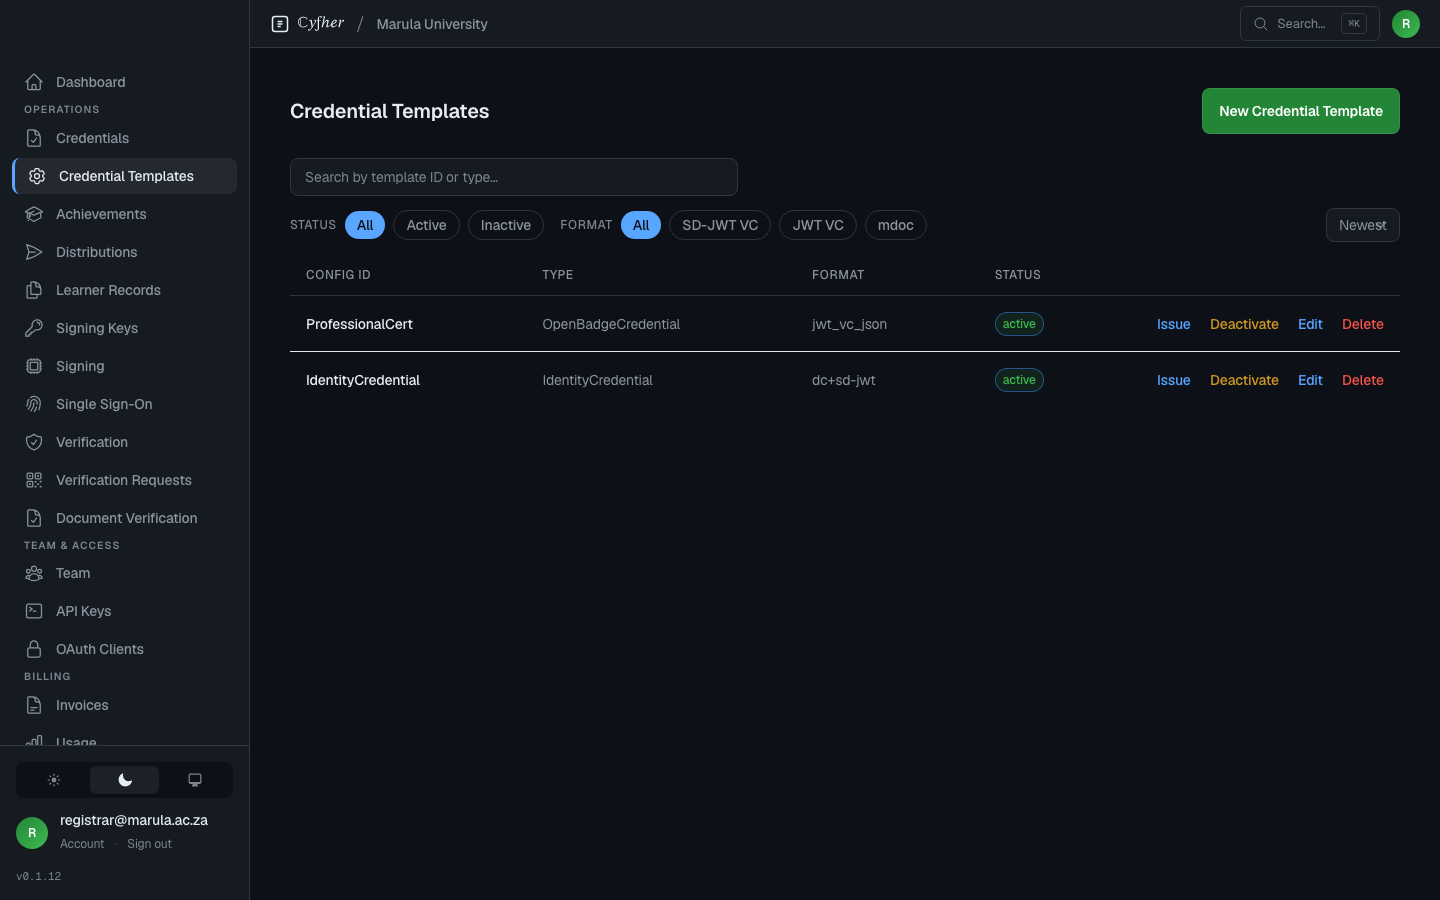
Click Save. The configuration is created active and can be issued against straight away — there is no draft state. From the Credential Templates list you can Deactivate one to take it out of service and Activate it again later. Only active configurations can be issued against.
What’s next
Once active you have two paths to actually issue credentials:
- API issuance — the Distributions flow (distribution → batch → offers → commit → distribute) issues credentials programmatically. Even a single credential is a one-row batch. See Issuing a credential.
- Bulk distribution — for cohorts, upload a CSV. See Bulk distribution.